

(Editor’s Note: We welcome this guest post from Matt Suess. Matt, an Olympus Educator, has been a full-time professional photographer for over 30 years, the first 17 as a photojournalist. Since 2006 Matt has been a full-time fine art photographer and educator offering field workshops, online training, one-on-one instruction and more. He is currently based in Bozeman, Montana. Learn more about Matt at mattsuess.com.)
How many photos have you taken on a typical blue sky day that could be improved by either replacing the entire sky or by simply adding some clouds to your original sky?
Let’s face it, often we find ourselves out there photographing when the light isn’t 100% perfect, and when we don’t have the absolute perfect sky either.
Maybe you are a real estate or architectural photographer and have dozens of houses or buildings on your shot list and just can’t wait for the perfect sky for you to photograph them under. Or you traveled thousands of miles to your dream photography destination, only to have nothing but cloudless blue skies for most of your trip. It’s not like you live nearby and can just return whenever the sky cooperates.
If I just described your situation, then you might want to consider replacing those boring skies and breathe new life into them.
Luminar 4 for sky replacement
Luminar 4 has two tools in it that are perfect for sky replacement, allowing you to quickly and accurately replace or even augment your skies.

Here we have a simple real estate photo with a boring blue sky. How much can we improve the image by replacing that sky with some interesting clouds?
Prepping the image
What I do prior to any sky replacement is some quick edits to improve the look of the original photo. In the before/after screenshot above, you can see improved shadow detail, color and contrast.
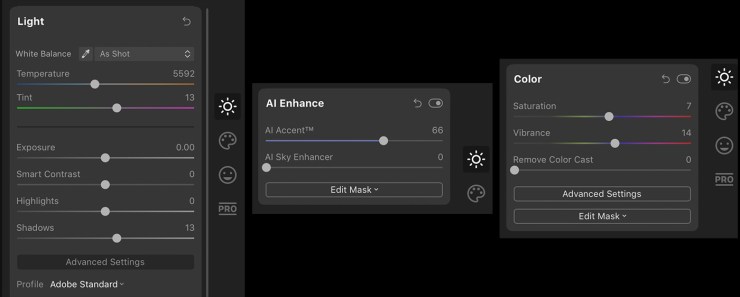
I used three tools, all in the Essentials tab. Using the Light tool, I changed the color profile to Adobe Standard and brightened my shadows. Using AI Enhance with the AI Accent slider helped even more by bringing out more shadow detail while improving color and contrast. Lastly, I used the Color tool to slightly increase Saturation and Vibrance.

Working with layers to replace a sky
Next up is sky replacement. But before I do that I like to create a new Stamped Layer, as seen above. Click on the Layers tab, then the + icon and choose Create New Stamped Layer.
When you create a new stamped layer, that new layer is created with all the previous adjustments applied into a new layer (it even merges any other layers you may have below). Think of it as a merged copy of everything you have done till this point. You then have a new fresh layer to continue editing, as of your sliders are reset again on this new layer.
Had I not created a new stamped layer, once I replace the sky the settings I did before with the AI Accent slider will end up effecting that replaced sky, usually in a negative way. You may find your new sky is too contrasty and possibly with some halos, as the original adjustments you did before are applied to the new sky. But by creating a new stamped layer before sky replacement will prevent this as your sky is brought in without any enhancement.

The settings I used in the AI Sky Replacement tool are above, using a sky from my Blue Sky Clouds Kit 1. Almost all the settings were at the default, with the exception of the Atmospheric Haze slider, which I increased to add more haze and make the results more believable. I recommend always taking a look at this slider when doing your own sky replacements.
I also lowered the Sky Exposure to better match my sky to my foreground. If I noticed any errors where Luminar didn’t do a great job completely removing the original sky I would take a look at the Sky Global, Close Gaps and Sky Local sliders.
I used the AI Enhance Tool again, but only used the AI Sky Enhancer slider to add just a little more punch to my sky. Adding a little AI Sky Enhancer to this image was the final touch for this photo.

Enhancing a sunrise
Let’s take a look at a landscape photo photographed at sunrise in Zion National Park, UT.

Above is the before/after of my initial edits. I used the Light and AI Enhance Tools similar to how I showed earlier. After getting the base image looking good, it was time for a New Stamped Layer for the sky replacement.

Using a sky from my Desert Sunset Kit, you’ll notice I made some slight adjustments to the Horizon Position (to adjust the placement of the sky), the Relight Scene (very slight adjustment to better balance the new sky and foreground), as well as slight adjustments to Sky Temperature and Sky Exposure.

Yes, I did use a sunset photo at sunrise, but could you even tell?
I believe the end results show a more dramatic scene than the original. I yearly lead workshops in Zion in the fall and have occasionally seen sunrises and sunsets like this. But for most people visiting for only a few days, if the weather isn’t perfect you’ll be seeing the sky we had here in the original. So why not replace the sky and create something even better than what you saw?
Adding dimension through clouds
Let’s take a look at one last photo. Sometimes you really like your sky but just need to add a few clouds to it, like with this photo of a sunflower against a bright blue sky. If only it had some clouds — what a difference they could make!

Here I used Luminar 4’s AI Augmented Sky tool which is perfect for adding just clouds or even other objects. In fact, Luminar 4 comes with some clouds along with other objects like hot air balloons and airplanes specifically optimized for this tool.

I used one of the clouds I have specifically designed for this tool from my Blue Sky Clouds Kit. The most important slider used here was the Defocus slider to blur the clouds, as it wouldn’t look natural if the clouds were still in focus.
I could have done a complete sky replacement instead. But I liked the blue in the sky and felt all it needed were some clouds. What do you think?
Pro tips for sky replacement
Pro tip 1: When adding clouds behind a close-up image like with the sunflower example, use the Defocus slider to soften the clouds to make your image realistic. Most close-up photos will not naturally have an in- focus sky.
Pro tip 2: For realistic sky replacements, pay attention to where the light is coming from in your original image and make sure your clouds have light coming from the same direction. Sometimes you may need to horizontally flip a cloud image to match the direction of light in it to that of your original photo.
Pro tip 3: Use the Atmospheric Haze slider in the AI Sky Replacement tool. This slider is great for adding haze to the sky and thus making your sky replacements more believable.
By using the power of Luminar 4 with its AI Sky Replacement and AI Augmented Sky tools, you can breathe new life into boring photos by either replacing the entire sky or by just adding a few extra clouds to them.
Want to get skies and clouds to enhance your images?
Matt has assembled a huge collection of now over 700 cloud and sky images perfect for sky replacement. Split across three individual kits, you can find Matt’s original Ultimate Cloud & Sky Backgrounds Kit for Sky Replacement with 400 photos here, his new Blue Sky Cloud Kit 1 here (featuring 200 blue sky clouds plus 60 clouds specifically optimized for Luminar 4’s AI Augmented Sky tool) and his new Desert Sunsets Kit 1 here, which contains 45 sunset photos.
You can purchase them individually, or purchase both the Blue Sky & Desert Sunsets Kits together at a discount. For even more savings, purchase all three kits together!


Good advice Matt. I would add one more tip. Use the Edit Mask in Luminar 4 to erase any bleed through of the layer under the subject. Depending on the sky used and the exposure of the sky, this is helpful to remove the blue tint that comes through
While I can see some use for sky replacement, perhaps for fine art, add agency or other use, it does bring up ethical questions as well. To an extent it’s like hunting animals in a game preserve while they are tied to a tree. Personally I much prefer the work ethic of the photographer who visits a location 50 times and is rewarded for their patience and persistence with a truly natural image. I have seen so many times where photographers have passed off obviously sky replaced images as original. If someone were to use one of Matt’s or someone… Read more »