

Three things so many people seem to want to avoid. The first one, sure! The second … well, maybe? But macro photography … no way! So if you have been avoiding trying macro, now there is NO excuse. Here are just a few simple steps to get you shooting macro in no time.
Bought a macro lens and never use it?
OK, hands up, who is guilty here? I know I was years ago. Bought a macro lens and then, well, left it in the cupboard.
Well, it’s time to dust it off and put it on the camera. Doesn’t matter what size — 50mm, 90mm, 105mm — they are all fabulous. There are a few other things you might find handy as well — here’s my seven favorite tools for macro flowers.
Depth of field
So many people assume that if your macro lens can shoot wide-open like f/1.8 or f/2.8, that’s what you should use. Wrong — especially when you first start out. The depth of field (DoF) is so small close up, so try with something like f/5.0 (or even f/9) until you get your eye in.
There will still be blur, but enough DoF to get your image sharp. Once you get used to using the lens a bit more you can get more experimental with the aperture. But why frustrate yourself in the beginning? It’s better to get your subject sharp, than the background blurry.


Distance
Depending on your lens you do NOT need to get super close to your subject.
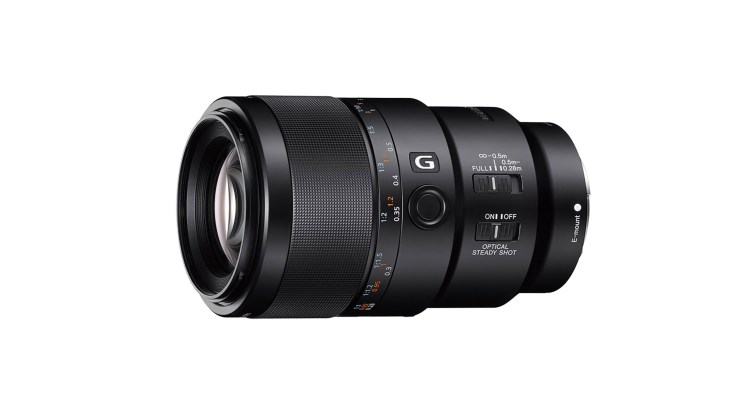
Often a lens will have different settings you can choose for distance. On the side of the lens there are usually two switches — the one at the top (pictured below) has three settings: Full, Infinity–0.5m and 0.5m–0.28m. These distances may change from lens to lens but will remain in the same setup.
Full is shooting several meters from your subject, but no closer than 0.5m, suitable for portraits. The next set of numbers is the midrange. In the below image this lens will focus best on this setting when the focal distance is around 0.5m from your subject. The last setting, closet to the camera is for up-close shooting up to the minimum focal distance of 0.28m.
The Optical Steady Shot (this name may change from brand to brand) allows you to quickly turn the stabilization on and off. Some lenses may have a Manual/Autofocus switch as well.
When talking about macro photography the tech head often refers to 1:1, 1:2 or 1:4 (or perhaps a few more). Without getting bogged down in details, 1:1 is super close, 1:2 is pretty close and 1:4 is what our eye is looking at — approximately. So if you want to get super close, flick the distance switch closest to the camera and then use the focus ring to wind your lens out to 1:1. You should see it marked on your lens.

Use a tripod or macro rail
While carting a tripod around can be annoying, using one will certainly make your images much sharper, due to the stabilization. Note if using a tripod, turn the in-camera stabilization off. While using a tripod can be good, something like a macro rail can be a game-changer. It is stable, but it also offers the ability to make small movements to achieve great focus and composition.

Use the live view function
Honestly, why I never learned this straight off, such a lifesaver. When on live-view often many cameras have a zoom or magnification setting. You can zoom in 1x, 5x or even 10x magnification (check your camera make and model) you can then check if your subject is tack sharp.
Some brands (like Sony) have peak metering to help with focus too. You can choose either autofocus or manual focus. Either are perfectly fine, as long as you can move your focus point to where it needs to be.

Use a remote or 2-second timer
When you’re this close and your subject that small, the slightest movement can introduce camera shake. So place your camera on a 2-5 second timer or use a remote shutter release. The least amount of interaction with your camera, the better. If you’re handholding your camera, make sure the shutter speed is significant enough to compensate for minor movements (1/320s) and hold your breath. It may sound silly, but it works.

Now that we have covered some of the basics, why not grab your gear and get shooting, even if it’s just in your own backyard? Practice makes perfect and a lens sitting in the cupboard is such a waste.


hmmm macro rail? off to some online shopping I go lol
Not going to lie, they can be a pain in the butt to carry around, but for macro photography….soo totally worth it. Especially if you want to do stacked macro! They are the bomb for nailing the perfect focus too!