

As someone who’s had a Drobo for the past several years — first with a four-bay version and more recently a 5D3 — I was intrigued when I was offered the opportunity to receive a Drobo 5C for review.
The 5D3 has served me well, with zero problems. It’s fast, and I love that it’s Thunderbolt 3 compatible with my new MacBook Pro. The 5C, on the other hand, is already proving its worth, serving to be a great backup device to my primary 5D3.
Why have two Drobos?
This is a question I asked myself. But I quickly realized that it’s a good idea to have multiple copies of something, and then some additional copies even after that. By having a 5C as my backup device, I know I would be getting a system that would secure my photographs and video files for the long run. One Drobo is my working drive, while the other is my backup.

Not wanting to spend an arm and a leg on new drives for my 5C, I decided to upgrade a few of the drives in my 5D3, as that would be my primary drive where my files would ultimately live. I ordered three Seagate IronWolf 6TB NAS hard drives, which have faster 7200 RPM speeds, and used those for the 5D3, along with one of my older drives. I then took out three of my existing Western Digital Red 6TB drives, and put those aside for the 5C.
Switching up the 5D3
The downside to swapping out drives with the 5D3 is you have to do it one at a time. Each new drive has to remap with the data on the remaining drives before you can replace another drive. The upside is during this process, all of your data is still available. So I took out one drive at a time, and replaced it with one of my newer drives. You’ll be met with red error lights on the device and in Drobo Dashboard, as well as an error notification at the bottom of Drobo Dashboard explaining a drive has been removed. You can obviously ignore these.
Note that when you add in a hard drive to a Drobo unit, it will format the drive, so make sure you don’t have valuable anything on it!
During this process, Drobo will remap the data on your new hard drive, meaning I had to go through the process three times, one for each new drive. Drobo Dashboard will display a progress bar telling you how long it will take for the drive to be remapped. It’s all automatic, and starts as soon as you enter your new hard drive into the Drobo unit. The entire process took about 36 hours to complete; the time depends on how big the hard drive is and how much data you have (the more data, the longer it takes).
Once my three new drives were remapped, the 5D3 was basically set to go. From there, I plugged in my 5C.
Using existing drives with the 5C
As I mentioned above, I took three of my Western Digital Red 6TB drives out of my 5D3, so I could put them into my 5C, this time all at once. But when I first did it, I was met with errors in Drobo Dashboard saying my drives weren’t recognized or formatted correctly. It’s then that I realized I would need to manually format the drives.
To do this, I double-clicked on the 5C, then went to the Tools menu and clicked on “Erase & Factory Reset.” Because my drives in my 5C once lived in my 5D3, I wanted to make sure that the drives were fresh and that Drobo Dashboard saw them as new. This can be a scary thing to click, but note that the 5C at that moment is an empty box. There’s no data that lives on it. Just to ease my mind, I ejected my 5D3 from my computer before starting the process.

Once that step completed, I clicked “Format.”

From there it asked me to complete a few steps. I got to choose what to name my 5C (I went with “Drobo Backup”), and it then asked me how I wanted to format the drives (HFS+ was the only option presented).

The formatting took a few minutes but then was ready to go. My empty shell remained, but it was a working empty shell!
![]()
Cloning my 5D3 to 5C
I knew from back in my I.T. days that Carbon Copy Cloner would do exactly what I needed in terms of syncing the 5D3 to the 5C. While it had been years since I used it back in college, I went ahead and downloaded it the 30-day trial.
It was very easy to set up. I was able to create a Task Plan that setup my computer to make a copy of the 5D3 on a daily basis.

In the advanced settings, I made sure to run the task overnight, so it wouldn’t disturb my workflow. I also made sure to check that the task should be run as soon as the devices get reconnected; handy in case of a vacation, or the power outages that Michigan ice storms often provide.
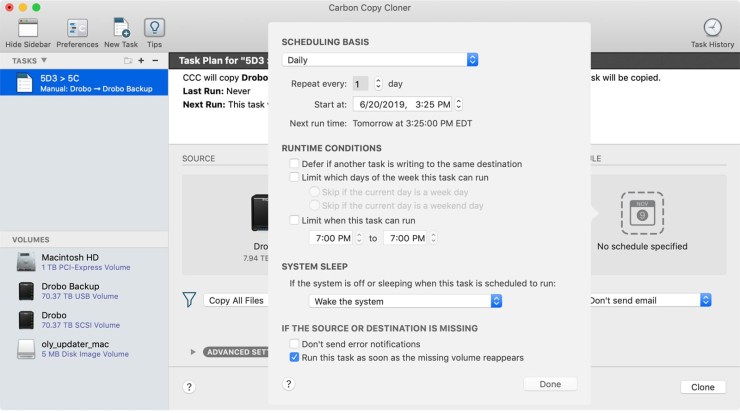
I also setup email notifications, so I could be alerted in case of any errors. While I rarely don’t have my laptop with me, there’s the occasional time where I’ll travel to visit family and will leave my work behind. So it’s good to know what I’m walking into while I return. Luckily, I’ve not received a single error yet.
Then I let it run. It took several hours — again, you might want to run this overnight — but after the initial backup, it takes merely a minute or two to complete (depending on how many new files you have).

My 5C (known as Drobo Backup) now sits in Drobo Dashboard and my macOS Finder just like any other drive. I know that if I accidentally delete something from my Drobo while using Lightroom Classic or other programs, I can immediately restore it without worry.
Save 10% on your Drobo on drobostore.com, by using the code PHOTOFOCUS!


Your second backup should be something that you can store off-site. If you are the victim of a robbery or a fire, having two backups in the same place will be of no help.
Oh I agree completely, you definitely want an off-site backup too. The method above primarily takes care of the “what if” question when it comes to accidentally deleting your data. But it’s important to also have an off-site hard drive backup as well as a cloud backup through something like Backblaze.
I did the same thing a few years ago, but in my case I added a 5C to my 5N (network). As strange as it sounds the 5C is faster than the 5N for some reason. One advantage to doing that is that my backup software uses a separate user ID to connect, and make the backup. If my computer gets encrypted by a bad guy, my 5N is isolated. Of course you still need that third copy off site.
BTW, that was a nice article Bryan.
Thanks Bob!
I use this Drobo set up as well. (5D3 -> 5C) I had been using a 5C as a backup to internal drives so my “migration” was a bit different. Overall I’ve been happy with this configuration.