

The first thing you should do when you start to make a landscape photo is to ask yourself, “What do I like about this picture?” The answer will guide you when you make the picture with the camera, and it will guide you when you finish the picture on your computer. Let me show you what I mean.
Standing in the clouds
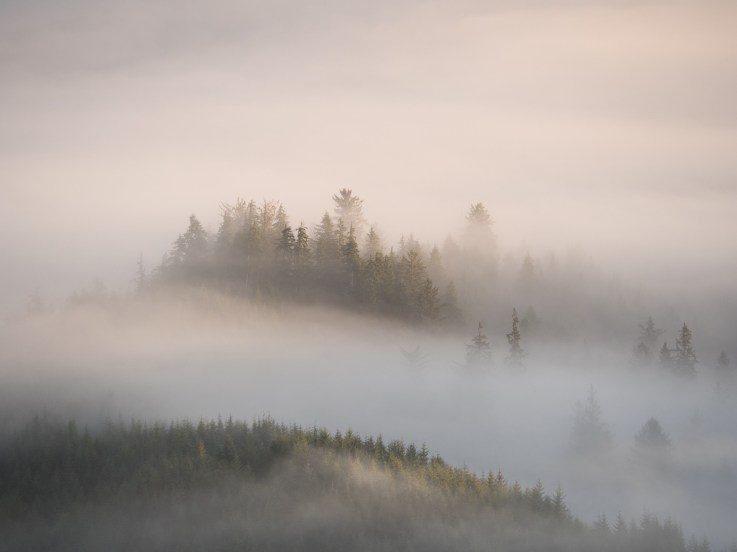
I made this photograph last week while teaching at the Out of Oregon conference. My students and I were standing on a high ridge hoping to find clouds filling the valley below us, and we were lucky enough that it was. As the temperature rises with the sun the clouds begin to flow through the valleys and the scene is constantly changing until it warms enough that all the clouds are gone. We stood there amazed, shifting our compositions continuously to try to record the feeling of being there.
When I asked myself, “What do I like about this picture?” it was easy to pinpoint. I liked the trees poking up through the mist, all the texture of the clouds as they moved through the trees, and I liked the subtle color changes as the sun rose. When I looked at this picture, I wanted to imagine how it would feel to stand in those trees as the clouds flowed around me.
Finessing the clouds
These clouds require finesse. If you trust your camera’s light meter, it’ll tell you that this picture is too bright and will have you underexpose it. That’s because the camera can’t tell the difference between colors and tones. It sees white and thinks it’s too bright. It likes things to be nice and gray. You should normally override the light meter’s idea and make this scene brighter.
But in this case, trusting the light meter isn’t a bad idea. All that texture in the clouds is only recorded if the exposure isn’t too bright. Since I knew that I could brighten this picture in post-production, I underexposed it about 2/3 of a stop to keep the detail and color in the clouds. Knowing what your finishing tools can do is essential to knowing what to do in the camera.
It would have been better if I had stopped the aperture down a stop or two to ensure maximum sharpness, but I was also balancing the ISO to be as low as possible. These were the settings on my Lumix G9 with 100-400mm lens: f/5.6, 1/250s and ISO 320 all mounted on a tripod.
One and done …?
No way. I did not shoot just one frame. With the scene constantly shifting, I constantly shifted my camera to take advantage of new revelations in the mist. In fact, I like this picture a lot, but I’m not even sure it’s the best one from that morning because I haven’t looked through all of them yet. Don’t be shy about shooting more compositions. The chances that you nailed it on the first setup are pretty slim. Shoot it again, but move the camera and try something a little different.
Retouch with restraint
Finishing a picture is challenging: There’s so much you can do with Photoshop, Lightroom, Luminar, ON1 and Topaz — how do you not get lost in the options?
The key is to let that original question guide you. “What do I like about this picture?” Because you identified it when you made the picture in the first place, it can guide you through your finishing efforts.
My vision for this photo wanted it to remain misty and gentle with detail in the clouds and the subtle color shifts.
Because I know a lot about what my tools can do, I chose to use Luminar for its marvelous color tools. I know Photoshop can do the stuff I need, but I don’t know how to do it in Photoshop. Luminar’s easy menus and slider-based adjustments make it simple to get great results.
Gentle contrasts
This picture is all about the difference between light and dark and the difference between cool and warm. These contrasts are gentle, though. In the Essentials pallet, I used the controls in the Light tab to pull the Highlights down and increase the Whites. I also nudged the Shadows down a little.


Next, I used the Pro pallet’s Advanced Contrast controls. These helped me show the detail in the clouds and in the trees. Punch and impact come from increasing the contrast, but these tools let you do it very precisely so that you don’t just end up with black trees on white clouds. They also set the stage for color adjustments.
The sky is blue and shines a blue light on everything. The sun is brighter than the sky and covers its blue light with the warm tones of sunrise. As the sunrises, the blue and orange colors battle to fill the scene. The Color Enhancer emphasized both colors and that contrast is really powerful. But I wanted to guide my viewers to the center island of trees so I edited the mask and painted the Color Enhancer only on that area with a soft-edged brush. Areas of increased color and tone contrast draw your eye when you look at a picture.

A good start
Just as I’m not sure this is my favorite from that morning, I’m also not sure I’m done finishing this photo. It looks good to me now. I see the feelings of being there. The clouds are shifting and inconstant. They are chilly, but as the sun rises the whole world warms. The trees on the island in the middle have matured since their last harvesting, while the dense trees in the foreground are much younger. Everything changes and shifts — including my skills and opinions on retouching. Maybe I’ll change this picture another day, but for now, the question I asked myself on the ridge-top has a pleasing answer.


