

Knowing multiple ways to use Lightroom and Photoshop for post-production can help you save time by shooting with your post-production workflow in mind. The final image you see here was the result of pre-production planning, capturing the images I needed, processing them the same exact way in Lightroom, then blending them together in Photoshop before a return back to Lightroom for output.
Heres the story. I was testing out a cool app called PhotoPills (www.photopills.com), which is an app packed with all kinds of data to help you plan for including astronomical objects in your photos. It was the day before the full moon in August, which is often when I like to shoot the moon because it appears pretty darn close to being full, but it comes up before sunset (as opposed to the full moon that rises right around sunset). PhotoPills makes it very easy to visualize where the moon will appear in a scene, and provides you with the time it will be there. I thought I would try to use the Nubble Lighthouse in York, Maine, as my foreground subject, which has to be among the most photographed lighthouses in the US as it is very scenic and very accessible.

I scouted out two potential locations for where I could position myself. As with photographing any location you always face obstacles to where youd like to position yourself due to the terrain. The first location I picked would allow me to include the lighthouse and the moon as it just breaks above the horizon. The problem with this location was that there is no guarantee you would see the moon at the horizon. While the sky was mostly clear, there is often a layer of cloud along the horizon that just blends with the sky. You won’t realize the moon has risen until it gets above that layer. So, to be on the safe side I scouted another location that would put the moon right over the lighthouse once it got higher in the sky. It was an awesome view of the lighthouse, but there was a significant problem here too. In order to position myself to get that shot Id have to include all of the power lines that ran from the mainland to the island where the lighthouse is located, and theyd go right across my frame. Oh, and because this location is so popular Id also probably have a bunch of people in my shot too. I knew from the start that Photoshop would also be a part of this project.
As it turned out my first location was a bust due to the clouds blocking the moon from appearing at the horizon. I was grateful to have a plan B. After scrambling up the rocks, and weaving through the crowd I saw the moon was moving right into the expected location above the lighthouse. As I looked at those power lines and framed up my shot I remembered a tip that John Paul Caponigro had demonstrated at Photoshop World many years ago. He showed how you could take two photos of the same location, but slightly shift the camera position, and then align the photos and blend them together to remove distracting objects from the frame. Sure, Content Aware is great, its amazing in fact, but it doesn’t beat having the actual real pixels to work with. So heres what I did. I raised the center post of my tripod until the moon appeared fully above the power line, and then framed the shot. Then I simply lowered the center column back down and took another shot. Now I had two crappy shots, but my hope was that I could use the pixels in both to create one awesome shot. And a shot not many people had because what photographer in his or her right mind would intentionally include 6 power lines across the frame of a lighthouse photo? There was only one other guy on that side of the lighthouse with a tripod.

After returning home and importing the photos into my Lightroom catalog I needed to process these two photos the same exact way so that I could seamlessly blend them together. There are a couple of ways to synchronize settings between multiple photos in Lightroom, but for this job I enabled Auto Sync. Auto Sync is an incredibly powerful tool that allows you to process multiple photos at once. Start by selecting all of the photos you want to process the same exact way (in my case it was just these two). Then click the little switch next to the Sync button to change that to Auto Sync.
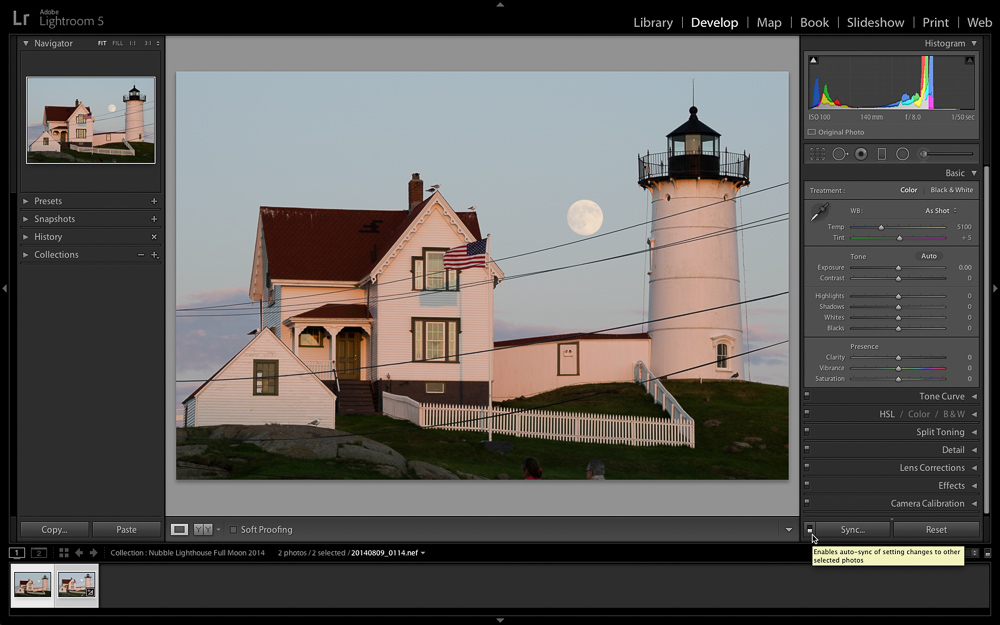
Now everything you apply to the most selected photo will simultaneously be applied to all other selected photos. At this stage I used Lightroom to set a camera profile, apply capture sharpening, set white balance, enable lens profile correction, and a slight tonal adjustment. After both photos had been adjusted I disabled Auto Sync by clicking that same switch, and then used the Photo > Edit in > Open as Layers in Photoshop menu to have Lightroom send copies of both photos, with Lightroom adjustments, to a single document in Photoshop.
With Photoshop open, and both photos on separate layers my final task was to blend them into one final image with no power lines. I selected both layers by holding the Shift key and clicking the other layer, then used the Edit > Auto-Align Layers command (set to Auto) to line them up. With the lighthouse aligned on both layers I could toggle the top layer on and off and see the power lines shifting up and down. It was as if I was able to peek under the lines and access all the original lighthouse pixels!


Now I could use a simple layer mask on the top layer and paint away the pesky power lines to reveal the obscured parts of the lighthouse on the bottom layer. Could I have used the Clone Stamp Tool, Healing Brush, and Patch Tool to get a similar result? Sure, but it would take a lot longer. Using a layer mask I just needed to use the Brush Tool and paint with black to hide the lines in a snap.

I did end up using the Clone Stamp tool to clean up around where the power line crossed the flag and a couple of other spots where the two photos were not perfectly aligned, and then tidied up the roof of the building (darn seagulls!). I also used the Patch Tool set to Content Aware to remove the people from the bottom of the frame. All in all, I saved myself a bunch of time in post by taking the time to shoot that second frame.
As I worked in Photoshop I used the File > Save menu to save what I had done, and then continued to use that File > Save command over and over as I worked. The first time File > Save is used after sending a copy from Lightroom two things happen. The first is that this new copy is actually saved to your hard drive, and it is saved right back to the folder where the source photo(s) lives automatically. The file type, color space, and bit depth of this new copy are determined by Lightrooms External Editor preferences. By default that is set to 16 bit ProPhoto RGB TIF. I leave it set to this default, but you can change it to PSD if you prefer. The second thing that happens is that this new copy is automatically added to the catalog, and it should appear right alongside the original (if it doesn’t, go to View > Sort, and make sure it is set to Capture Time or File Name). After finishing in Photoshop I used the File > Save command one last time, then closed the image out of Photoshop. Returning to Lightroom I found the new TIF file right alongside the original raw photos. I added a little Clarity and Vibrance to the new TIF version back in Lightroom and called it done.
Come learn Lightroom with me while we create amazing photos in some of Americas most beautiful places!


