


As a new hunter, I’ve been devouring so much information available out there about hunting and I realized that I can contribute back by sharing some simple ideas to help hunters make better pictures. There are so many traditions and beautiful landscapes surrounding hunting that you should really take advantage of the opportunity to make pictures and record memories.
These tips will help you do it more effectively and more creatively, and they’ll actually serve you well anytime you’re traveling with others.
Get ready
You’re likely hunting with someone else and you’re likely hunting game that’s not going to wait around while you make a picture. The best way to not get invited back for the next hunt is to be slow when you want to make pictures and make others wait for you to get your camera ready to shoot.
You need to be ready to go. Make a test picture well before you need to make a good picture. You might even want to use exposure bracketing (see your manual) to take three pictures in a row (one darker, one in the middle and one brighter) so you know you’ve got the picture exposed properly without having to stop and check the screen. If you look at the screen while people are waiting on you, your chances of going on the next hunt are going down.

Keep your camera handy. If it’s in your backpack you’ll never make a picture and you’ll make people wait while you get it out. My favorite tool for keeping my camera ready is the Spider Holster, and I use the Backpacker Kit to keep it handy while wearing a backpack (I’m an ambassador for Spider Holster). When your camera is handy you’ll end up making more pictures (and you’ll end up making better pictures).
Get gear
The best camera you can take hunting with you this year is the one you own right now. You don’t have time to learn how to use a new camera, and the one you have will work really well — there’s not a camera produced in the last 10 years that doesn’t make a good picture. Even better if all you have is a smartphone. Use it to its maximum and you’ll be ready for something more very soon. If you really want to spend on money on a new camera this year, I highly recommend getting a micro four-thirds camera, and as an ambassador for Lumix, I naturally recommend their bodies, though the Olympus bodies are also excellent. More specific? OK, get the Lumix G85 with 12-60mm lens and a 100-300mm lens. Don’t forget memory cards and batteries. I’ll write more about the perfect hunting camera in the future.
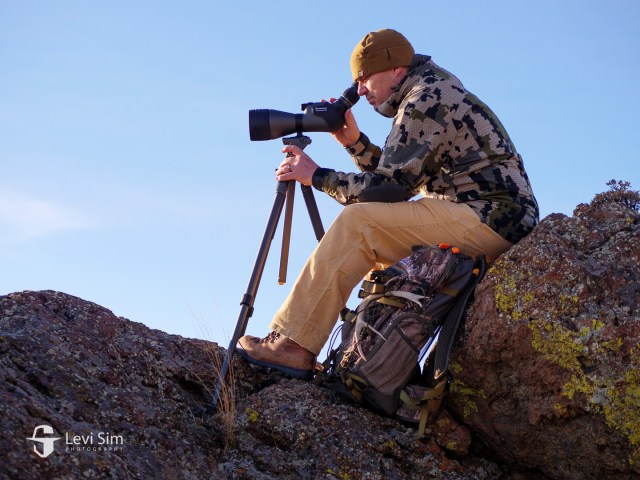
Bring a tripod so you’ll be able to get steady for low-light pictures and creative stuff and landscapes and especially time-lapses. You can also use it for glassing with your binoculars. I recommend the Vanguard Veo series, which are small and light and the included ball head is amazingly good. (Oh yeah, I’m an ambassador for Vanguard, too.)
Also consider getting a Platypod which I bring this with me everywhere. It’ll replace the tripod all uses except glassing. You mount a ball head to it and then you can strap it or stand it anywhere to make pictures. Get the Ultra with the accessories kit. I keep it handy in the side pockets of my pack so it’s as ready as my camera.

Get people
The most important things to photograph while hunting are the people. They are probably some of your best friends and family and you should make lots of pictures of them. Make pictures of people packing. Make pictures of people cooking. Make pictures of people setting up camp. Each of these will trigger stories from the folks in the frame and lead to good reminiscences.


Make pictures of people struggling up hills and hiking under heavy loads of meat. Make pictures of people working together. Most importantly, make pictures that include yourself. No one on an adventure gets a pass from being in pictures, and you have to set the example yourself. Use your Platypod to set the camera somewhere and be in a picture. Don’t make people pose or interrupt what they’re doing. Just make a picture of what’s going on. Following are more ideas about how to do that well.

Get down, get up and get close
If you put your camera lower and closer you’ll make better pictures — it’s that simple and your Platypod will help. When your pals are cooking, put the camera on the table next to the knife and angle it upward to include their faces. When they’re glassing, put the camera down by their boots and angle upward. Back up, zoom in and get your camera a little lower to make the mountain peaks or trees appear larger behind your friend. Get the camera closer to any action or discussion and you’ll get that kind of picture like you see in National Geographic. There’s an adage that says, “If your pictures aren’t good enough it’s because you aren’t close enough.”
Get up the hill first. Shooting downward makes things look a lot steeper and more rugged than shooting upward. Get in front and be ready when people walk by. Don’t ask them to slow down or stop if you miss the shot, just try again the next time.


Get variety
If you tell a story in a monotone voice, it doesn’t matter how good the story is because everyone will fall asleep. Zooming your lens and changing your perspective is like speaking with emphasis and punctuation — it’ll help keep your viewers interested through the whole thing. You should photograph everything twice, once with a wide angle lens and then with a telephoto lens. Making both a wide and tight picture every time will give you a variety of pictures that will add flavor to your stories. You should also shoot everything both vertically and horizontally so you can fit them in a layout. Scott Bourne always says that the best time to make a vertical picture is right after you make a horizontal one.


Get creative
Once you’ve made safe pictures you should start making interesting pictures. Make pictures from perspectives we’re not used to seeing with our eyes and using techniques that our eyes can’t provide. Your camera can show stars streaking overhead or blurry legs and arms as people hike along. Your camera can freeze action and reveal how things are for an instant — even freezing an arrow flying free from a bow or a slow-motion bullet flying to its target. You can reveal details in low light and record colors from sunsets. You can use a flash for a commercial finish. You can use a trick lens (like the Lensbaby Edge 50 used below). You can even finish a photograph to look like a painting.
There is so much you can do with pictures, so once you get the standard stuff, have a little fun trying something different.

Get practice
Bow seasons are opening across the country right now, but you’ve still got time before the general hunting seasons to squeeze in some practice on these techniques. The great thing is that you don’t actually have to go hunting to practice. You can just take a hike or have a picnic with friends or photograph your spouse making dinner. Go out and hunt some small game and bring your camera each time. It’s not just big epic adventures that need photographing, but if you practice on smaller events then you’ll be ready for that trip to Alaska you’ve been planning.

Conclusion
Hunting is a big part of life for so many of us and there’s a lot to learn about it each time you go out. I’m new, so I’m learning loads every day, but if you’re an old hand at hunting these tips will help you have some new fun making pictures of your adventures. Remember that the most important thing you photograph is the people you love to spend time with and use these tips to ensure those people don’t kick you out of the group for slowing them down with your fancy camera work.


