

When Drobo announced it had declared for bankruptcy earlier this summer, I was slightly concerned, but was hopeful that the company would continue supporting its products, especially with things like updates to macOS and Windows.
Recently, Drobo came out with a statement that put doubt on whether its units would be compatible with future OS updates, including October’s macOS Ventura update, which they have listed as “currently incompatible.”
So, I decided to do some homework, and look into a few options that could potentially replace my Drobo 5D3 unit. First up? The OWC ThunderBay 4.
Editor’s note: OWC sent us the ThunderBay 4 to review and keep; however, all opinions about this product are our own. We have not been told what to say. We tell you this as we always want to be upfront and honest with you.
Pros
- Very fast, taking advantage of Thunderbolt 3 speeds (a dedicated Thunderbolt 2 version is also available)
- Offers pre-built units with RAID 0/1/4/5/1+0 or JBOD up to 72TB
- Can connect a 4K display via DisplayPort 1.2
- Can mix and match 3.5-inch and 2.5-inch drives
- Fan is pretty quiet; no louder than my Drobo 5D3
Cons
- Uses third-party SoftRAID XT software, which is somewhat cumbersome to set up
- Can be a bit of a pain to lock the cover to the unit
- Included Thunderbolt cable is very short
OWC ThunderBay 4 — Technical specifications

All technical specifications have been taken from Amazon:
- Storage capacity: Configurations available up to 72TB
- Number of bays: 4 x 2.5″/3.5″
- I/O: 2x USB-C (Thunderbolt 3 @ 40 Gb/s); 1x DisplayPort 1.2
- RAID: RAID 0, 1, 4, 5, 1+0, JBOD
- Transfer rates: Up to 1527 MB/s
- Security features: Kensington Security Slot
- AC input power: 100-230 VAC, 50/60 Hz
- Operating temperature: 50 to 95°F / 10 to 35°C
- Weight: 8.6 pounds
OWC ThunderBay 4 — Build quality
The exterior of the ThunderBay 4 is pretty slick. Featuring a metal exterior, the ThunderBay 4 will definitely keep your drives safe. On the front is a grated cover, that can be opened via the included key. This lets you access all four drive slots, which sit vertically.
The cover can be a bit cumbersome to get back on though; I found you have to insert the bottom first, and then push in the top. Compared to my Drobo, I liked that the cover was metal, but the magnetic attachment on the Drobo is more convenient.
The drives sit vertically and are attached to each slot with a pair of included screws. OWC includes plenty of screws here, at two different sizes, so you’ll have more than enough to attach your drives.
The back features a vented area where the fan is included, as well as two USB-C / Thunderbolt 3 ports and a DisplayPort 1.2.
OWC ThunderBay 4 — Initial setup

I used the 0TB enclosure, as I already had several extra internal hard drives sitting around. I was able to attach three of these, as the fourth had a warning that it was on the verge of failure (which, surprisingly, Drobo Dashboard did not alert me of).
If you’re coming from a Drobo, you do not need to worry about formatting these in Disk Utility or another app. Simply use the included SoftRAID XT application to initialize each drive. Note that you’ll likely get a few system errors until you finish the RAID setup, with macOS saying that it can’t recognize the attached drives.
The front also features five LED indicators — one for each drive, and then a master LED signifying the power state. These do not signify the health of a drive, rather, SoftRAID XT will alert you on your computer if there’s an issue with a drive’s health. The LEDs only signify power state, connection and drive activity.
For the most protection, I recommend using the RAID 1+0 option. This stripes your data evenly across your drives, and the data is also mirrored. It also typically offers te best performance, and it basically combines RAID 0 and RAID 1 to offer the best protection. macOS also natively recognizes this configuration. Four drives are required for this option, however.
The next best level is RAID 5, known as “Stripe with Parity.” This is what I chose, as it offers fast read speeds and good data protection. Three drives are required for a RAID 5 setup.
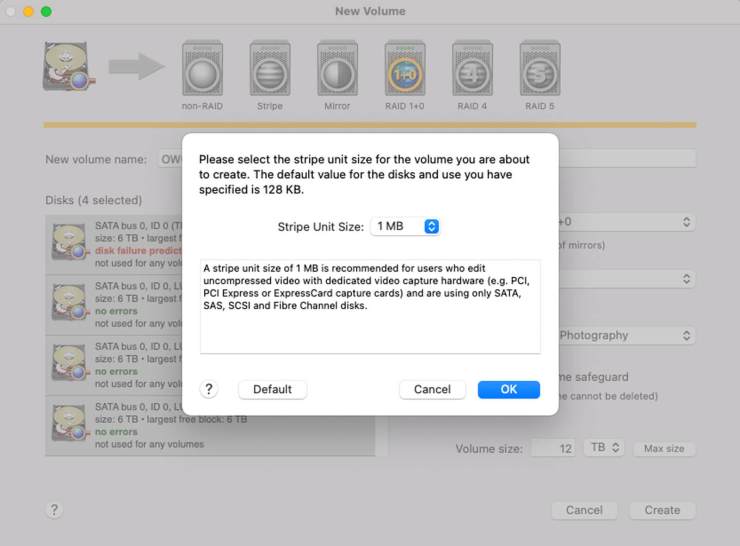
Setup via the included SoftRAID XT application can be a bit confusing. But once I got my drives initialized, it was smooth sailing. During setup, you’ll also be asked to choose a Stripe Unit Size. I went with the largest here — 1 MB — as I sometimes have to edit video straight from my RAID unit.
OWC ThunderBay 4 — Everyday usage

I’ve been using the OWC ThunderBay 4 now for a few weeks, and have so far been pretty impressed. Read and write speeds are faster than my Drobo 5D3. While the SoftRAID XT application isn’t my favorite to use, it is a widely supported application. And the nice thing is that if it ever goes away for some reason, you can use any RAID program of your choice to configure the OWC ThunderBay 4.
While the initial setup isn’t as easy as a Drobo unit, the good news here is that you really only have to worry about setup once.
I was impressed with SoftRAID’s ability to tell me that a drive was failing, as well. Drobo Dashboard showed that drive as being a healthy drive, so it appears that SoftRAID XT has better awareness in terms of drive health.
Going forward, the OWC ThunderBay 4 is likely going to become my daily driver (after I get a few new drives), while my Drobo will serve as a backup, as long as it continues to work.


Nice review, one question though, how is it when you need to replace a drive. And can you replace drives one at a time to increase storage capacity? I expect that’s more a question of SoftRAID functionality than the drive unit.
I’m guessing each drive shows up to the OS, and then SoftRAID creates the RAID configuration you want.
Excellent review. I have two Thunderbay 4 drives, one set up as a RAID and the other has four separate drives. I have been using OWC drives for many years and have been very happy with both their quality and the support from OWC. I agree with both your pros and cons about the Thunderbay 4. The cover can sometimes be a pain to get on and off.
Can the OWC support mixed drive sizes in a raid as Drobo can? Good review.
Thanks Dan. You can mix and match different drive sizes and brands no problem.
are you sure it can mix drive sizes? i’m pretty sure it cant. yes you can put different size drives in.. but its going to limit the raid size to the smallest size drive.. for example. if you put in three 6tb drives and one 12tb drive, your raid will “look” like four 6tb drives. SoftRAID allows standard raid configurations, not the “beyondRAID” of the drobo or the BTRS of synology that does allow you to mix and match drives but use full drive capactiy.
You can mix drive sizes, but the behavior depends on your RAID setup obviously. You’re right in that in certain RAID setups, it’ll limit the size of it. But what I meant is it’s not going to error out or not accept the setup.
I am running one of these and the biggest gripe compared to their past enclosures (that were using older thunderbolt tech) is that it is incompatible with your computer set to normal energy savings mode. If your computer sleeps and puts hard drives to rest it will Knock off the enclosure as of you pulled the plug.