

Holiday lights are so cool. If the tree didn’t dry out and start dropping needles, I think I’d petition my wife to leave them set up all year. They just give such a terrific mood. It’s because they have a warm tone and because they are so spread out they make a very soft light. Plus, when they are in the background of the photo, they make really cool bokeh bobbles.
I wanted to utilize these lights in the background, so I needed to build the light in the foreground so that it wouldn’t overpower the twinkle in the back. Here’s how to do it.
Use a tripod
These lights aren’t very bright, so you’re going to need to use a tripod to ensure you get a sharp picture with a slow shutter speed. This one ended up at 1/60s. The tripod will also help you compose your picture more perfectly. With a child sitting on a chair, the camera is quite low to the ground, and without a tripod, your back will get tired and you’ll have a hard time getting the framing just right for each shot.

Use a long lens
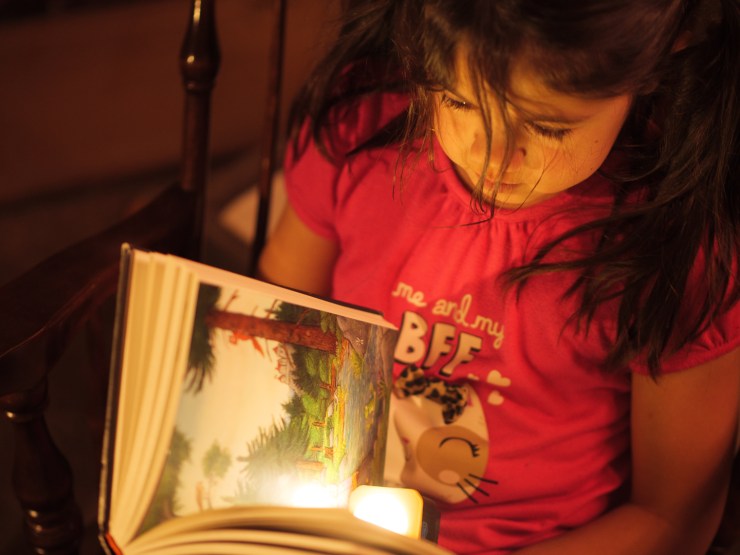
I used a 56mm lens, which is like a 112mm lens on a full-frame camera. It’s great because it makes the tree look like it’s filling the whole room. The subject is about six feet in front of the tree. If I used a wider lens, she would have to be closer to the tree to make it fill the background, and the camera would be closer to both.
When the camera is closer to the background lights, it makes the bokeh on the lights look less awesome. I used the Lensbaby Velvet 56, which makes the best bokeh on the planet and it gives the soft glow to the whole thing, which is just what I wanted.
I use continuous lights by Lume Cube
You could use flash for this, but it’s much harder than using small lights that are always on. I used two Lume Cubes. If you use flash, your camera will have a very difficult time focusing on your subject’s face because the room is so dark. Also, you’ll have a hard time getting your flash dark enough to match the lights in the back. You could also try a dim lamp or a flashlight.
If you use LED lights, make sure they don’t scan during your exposure, leaving you with light and dark bars; if you see bars, use a slower shutter speed — probably under 1/60s. Read more on that here. Lume Cubes are formatted so they won’t scan at any shutter speed.
Use a gel
Whatever lights you use, you need to make sure that they match the color of the lights in the back. If you used a flash without a gel, it would give a very white light and it wouldn’t keep the warm and gentle mood of the orange lights behind. Use a Color Temperature Orange (CTO) gel to match. The Lume Cube Air comes with a warm gel diffusion cover, and that’s what I used here.
Use the wrong white balance
Because these lights are all colored to match a tungsten light bulb, you could use the tungsten white balance setting built into your camera. That would make white things, like the pages of the book, appear white. In this case, though, we want that warm, nostalgic feeling. So, set your white balance to daylight and then the orange lights will remain orange and warm.
Set the exposure, adjust the lights
Use the background lights to set the exposure. Make them the right brightness for your shot, then adjust the brightness of the foreground lights to match the mood you’re going for. If you’re using lamps or flashlights, you might have to move the lights farther away in order to make them darker. If you’re using Lume Cubes, just open the app on your phone and slide the brightness down.
Where are the lights?
I’ve got one light set at the subject’s face height from camera-left. It’s got a little diffusion dome on it to make it softer (and warmer). It’s a Lume Cube Air, so the magnet on the back is stuck to the metal frame on a chair — anything that makes it easier to make a picture is good, and not having to set up a light stand in the living room is very good. This is the main light on her face.

There’s another Lume Cube in the book with a warm diffusion dome, as well. Take care that the book light doesn’t get too bright. It’s not intended to be a glowing magical book. Just a little fill on her face.

There’s another light from behind at camera-right. This is a big continuous light that is balanced for tungsten color, too. I’m not saying you need to buy a big light like this, but I owned it, and it was already set up from another project, so I used it for a little rim light.

Make pictures …
Now just make pictures with your subject. Ask her to look a little this way or that, reposition the book, etc.

… and make videos!
Since you’re using continuous lights, you can switch your camera to video mode and get the same look to the video that you get with the photos. Making a video was actually the whole purpose of this setup, and it was the best way to convince my daughter to play along with me. I love this fun idea we made together. Another benefit of using the tripod is that you can use a remote to make pictures with your subject, too. Keep those Holiday lights out a little longer (or get them back out) and make some moody portraits for yourself.
Portrait Tips come out each week, and you can see them all right here.


Some great tips and advice for portrait work, it’s a hurt part of my daily work and probably the best part of my job. I love the personal relationships I get to build and make shy people come alive in the pictures :)
Looks really nice. Has been always wondering of how to create the effect of christmas lights
Looks really nice. Has been always wondering of how to create the effect of christmas lights
Some great tips and advice for portrait work, it’s a hurt part of my daily work and probably the best part of my job. I love the personal relationships I get to build and make shy people come alive in the pictures :)