

Editor: Want to learn more about HDR? Check out this free online class.
One of the most common question about HDR photography seems to be how many images should I take? This has an easy answer and the answer is It depends.
That answer just isn’t very satisfying is it? Well, lets talk about why it depends.
How Brackets Work
The reason for taking bracketed images, and for using HDR techniques to combine them, is to solve a problem. The problem is that the dynamic range of a scene is too great for the cameras sensor to capture in a single image. Sometimes the dynamic range is greater than a single image can capture, but two images might be enough. Other scenes will require more maybe 3, 5, 6, or more images it all depends on the brightness of he brightest area, and darkness of the darkest area.
The number of images will be impacted by the Exposure Value (EV) spacing with which you capture the scene. 1EV can be considered one stop of shutter speed since we only change the shutter speed and not the Aperture or ISO. If your camera offers 2EV spacing, its a good place to start. After gaining experience, if you think that 1EV spacing works better, then thats completely valid too. With 1EV spacing, you’ll need to take more source images to cover the range.


Using Brackets to Cover the Range
Outdoor scenes can often be captured in a single image, or by the commonly-used 3 bracketed images. Here is an example of a scene with a somewhat high dynamic range. While one could make a nice picture with a single image, I decided to use bracketed images to increase the detail which could be seen in the final product such as the nice detail in the wood and the barrel:

Here is how I processed it using Tone Mapping in Photomatix Pro
Dealing with Tough Exposures
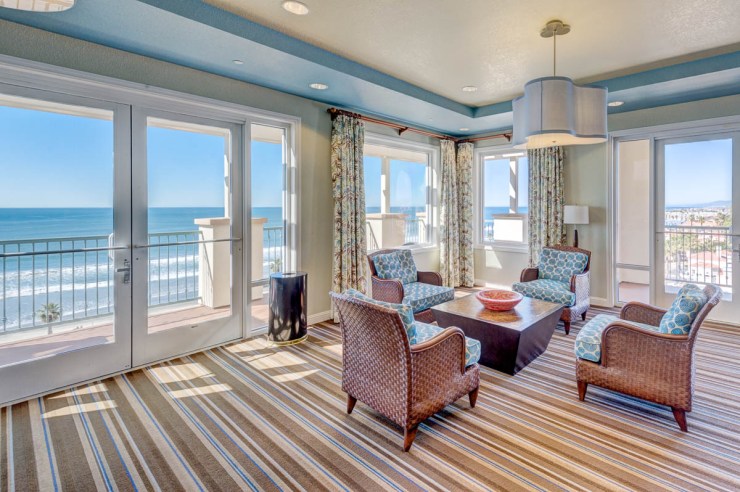
On the opposite end of the spectrum, here is a scene which definitely requires bracketed images (unless you decide to setup elaborate lighting). Trying to capture this scene with a single images, means the windows would be too bright and/or the interior would be too dark. This scene required 5 images (at 2EV spacing) in order to capture the somewhat dark interior and the bright ocean view outside. By looking at the bracketed source images here, you can see that no single image would capture it all.


Here is what the combined image looks like using Exposure Fusion (Fusion/Interior) in Photomatix Pro 5.1
So the answer to the question about how many images to take is It Depends. This means that its up to the photographer to measure the scene when the dynamic range is great. If the dynamic range isn’t so great, such as my first example, then it might be possible to simply take the 3 images and cross your fingers.
How to Measure the Scene
Measuring the scene normally means that you should use the cameras light meter in spot metering mode to measure the shutter speed for the highlights. Then measure again for the shadows, then set the camera to capture those extremes and all of the stops in between.
Its important to know your cameras manual settings very well so that you can set the camera accurately. Most cameras have a fast way to set Auto Exposure Bracketing (AEB) and its worth the time to consult your cameras manual for this. Being able to set the number of images and the EV spacing for AEB quickly can be liberating and avoid taking a long time to capture the source images. Some cameras have dedicated buttons for this, other require you to use the menu system. Still others have programable buttons.
I know that many cameras only allow 3 bracketed images in AEB mode shame on those camera manufacturers for making such a limitation. But many photographers work around this by changing the shutter speeds manually or taking 2 sets of bracketed images. With alignment in Photomatix Pro, there shouldn’t be any problem from camera movement.
For additional details on all the steps needed to capture and process this kind of scene, please see the tutorial that I helped write about capturing and processing a very high dynamic range scene, here is the link: http://www.hdrsoft.com/resources/real-estate/hdr-interior-tutorial.html


Thank you for sharing. Very helpful
Hi Ron, thanks for this information. I enjoyed seeing you and the others in the webinar yesterday as well. So…if I understand what you said correctly, increasing (or decreasing) the shutter speed by one step each time is the equivalent (+/-) to 1EV. Is that correct. My issue is that I tried HDR by adjusting the aperture, but then certain elements would get soft because they were no longer in sharp focus so I have changed my approach to adjusting the shutter speed, but want to know the ratio needed to get the equivalent exposures. Thanks for your consideration. J.… Read more »
Don’t change aperture… change shutter speed
You are definitely right to adjust the shutter speed only to avoid a soft/out-of-focus result. 1EV is equal to ‘1 stop’ so I would recommend to make sure you are adjusting by 1 or 2 full stops. Depending on the camera, this could be 3 ‘steps’ on the dial for example. Maybe these videos will help explain:
http://www.hdr-photography.com/videos/