

Sometimes (oftentimes), I shoot a little sloppily, knowing that I can make a change with software. I do my best to make things as perfect as possible at the time I make a picture, but I know what things I can do later so that I can work most efficiently. For instance, yesterday I was making portraits for the Steve Jobs Portrait Project at my local Chamber of Commerce meeting, but I didn’t have very much space.
The Issue Not Enough Space
The project requires a pure white background, but in a small space using a flash to whiten the background causes a lot of reflections and highlights on the dark side of the face, and I don’t want that–it doesn’t match Watson’s original portrait of Jobs. So, I shot a bunch of portraits knowing that I’d be whitening the background on the computer.

Normally, I use the adjustment brush in Lightroom with the Auto Mask function activated, and it does a pretty good job of only affecting the background–if the subject doesn’t have any tricky features or light colored hair. But yesterday I had a lot of people with tricky features, like the gal in the picture at the top of this post. She actually looked at her first take and asked me to do again after she fluffed her hair bigger! It looks great, but have you ever tried to select around something like that in Photoshop, let alone Lightroom?! It’s a nightmare, and far beyond my skill.
The Solution Perfect Mask
Until recently, I may have had to leave her out of the project because I wasn’t equipped to handle it. But now I’m using the new onOne Perfect Suite 9, and its selection tool is the world’s easiest and fastest way to clip someone off the background. Look at the results I got with this incredible hairdo!

How Easy is It Really?
Allow me to demonstrate how easy it is to use this tool. We’ll use this photograph I made in Seattle a couple of months ago. It’s not only got some tricky curly hair to work around, but also the blues of the water are similar to the tones of her sweatshirt, which throws many selection tools for a loop.

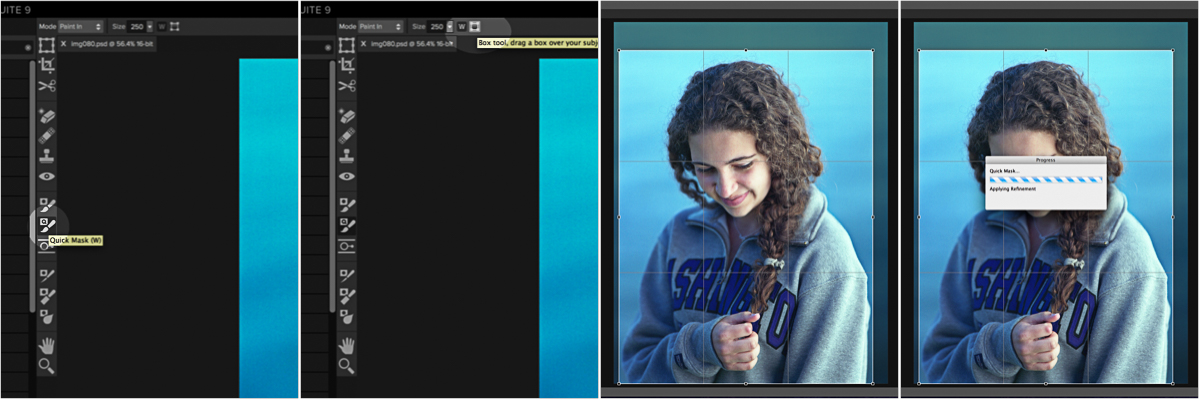
Use the Quick Mask Brush
Open your image in Perfect Photo Suite (click here for a 30 day free trial of the full suite) and choose the Quick Mask brush in the palette on the left. This brush is really terrific, but we’re going to switch it to the Box Tool. All you have to do is click and drag a box around your subject, and then press Enter. It’ll process for a moment, and then you’ll see the magic.

Wow! That’s amazing, really amazing. If you’re thinking this is just an easy example, I’ve also used it on a guy in a green jacket in front of a stand of green trees…it really is magic. The guys at onOne say it won’t do a polar bear in a blizzard…but I’d be willing to try it.
Refine the Selection
That left over blue area would be the hardest thing for me to remove, but in the Perfect Suite I just choose the Refine Brush and start painting the edges. Paint a stroke, let it cook for a moment, then paint again and watch the leftovers disappear.
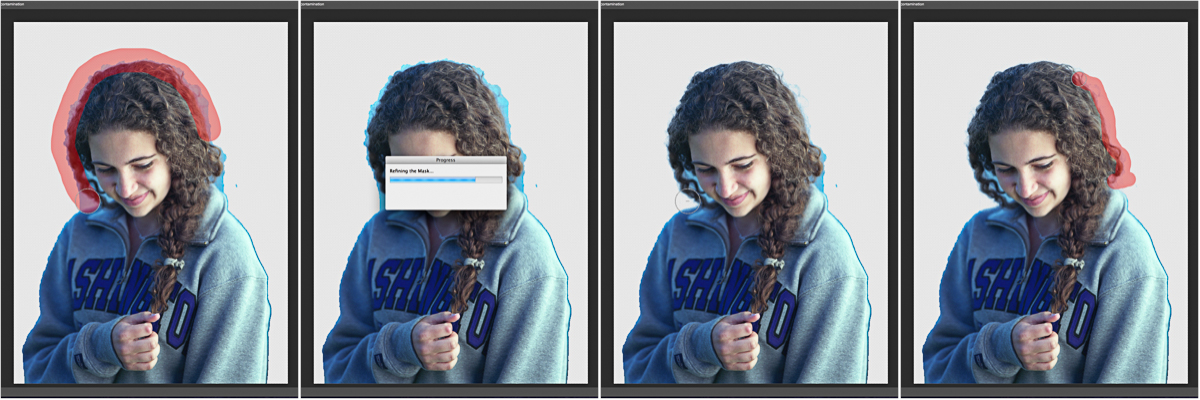
Here’s my final selection with the background removed.

Conclusion
Although I always prefer to get things right in the camera, there are many times I simply can’t. onOne’s new Perfect Suite 9 makes my workflow substantially simpler. I just can’t get over how easy it is to make difficult selections with their tools. I’ve always wanted to try those cool composites that I’ve seen out there, but my weak selection skills have held me back. Now, with this tool, I’m getting excited for the possibilities. I recommend you download the trial and see what it can do. I’m really glad that onOne are partners with us on this blog.


Reblogged this on faniaroseliza and commented:
Great Advice!